Blog
footwear tech pack template
What Goes in a Footwear Tech Pack
· Frank Vega
- footwear tech pack template
- shoe spec sheet
- tech pack
- footwear design
- sampling
- shoe last
- design students
By Frank Vega, founder of MYC
A factory cannot read your mind. It can only read your tech pack.
If the pack is thin, the factory fills the gaps with its own habits. That is how you get the wrong thread color, a heel half a centimeter too tall, or a sole you did not choose. Then you pay for another sample round to fix it.
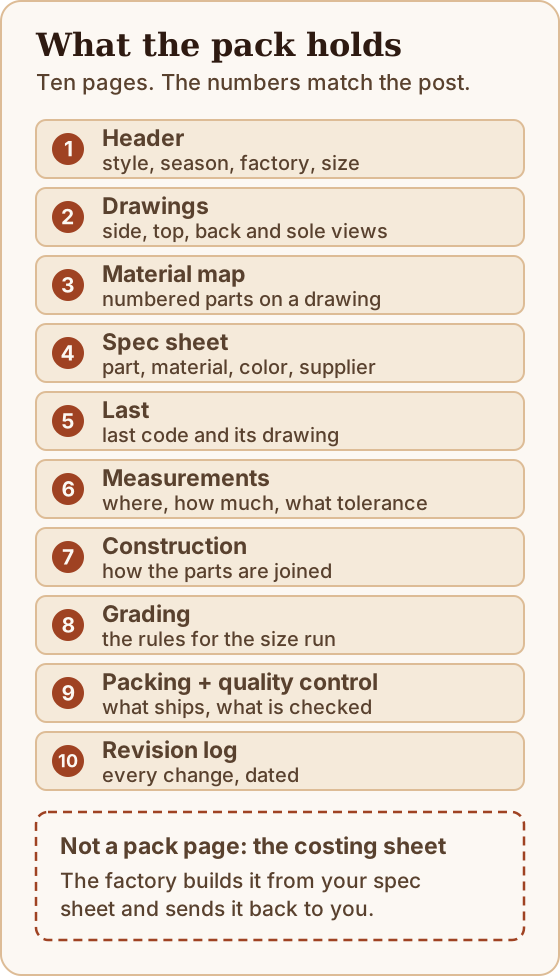
This post is a checklist for a footwear tech pack, which some people call a shoe spec sheet. Use it as a footwear tech pack template. A good pack has the same parts every time.
We checked our first draft against How Shoes Are Made by Wade Motawi, a book that follows a sneaker from the first drawing to the factory floor. Where the book and our draft disagreed, we changed the draft. The big changes: the last was missing, "spec sheet" meant the wrong page, and the costing sheet is the factory's job, not yours.
Tech pack or spec sheet?
The two words get mixed up. Motawi uses them this way, and so does this post:
- Tech pack: the whole set of drawings and documents you send the factory.
- Spec sheet: the table inside it. Every part of the shoe, with its material, color and supplier.
- Costing sheet: the factory's price for each line. The factory makes it from your spec sheet.
Our first draft used "spec sheet" for the measurement page. For footwear, the book's use is the better one.
The checklist
1. Header
Put the basics on page one. Motawi's header list: season, factory name, style name or number, outsole tooling code, size run, designer or developer name, last code, colors in this sample, and the sample round. Add the sample size.
The factory makes the first sample in one size, then grades the rest after you approve it. In the book, development samples are men's size 9 and women's size 7. Say which size yours is. If you leave it out, someone will guess.
2. Drawings
Draw the shoe as a flat technical drawing, not a fashion illustration. Skip shading. Show every seam. A full set in the book has:
- Side views: lateral (outside) and medial (inside)
- Heel view, tongue view (with any logo art), and a top view of the vamp
- Close-ups of small plastic parts
- The outsole: side profile, bottom view, top view, and a cross-section
- A texture map of the outsole surface
- A color map for this sample, and one for colors you plan next
Give colors as codes (Pantone numbers are one common way), not names. Show outsole color breaks early, because the book says they must be tooled into the mold. And put in as much detail as you can. If the factory team does not speak your language, a clear drawing still speaks for you.
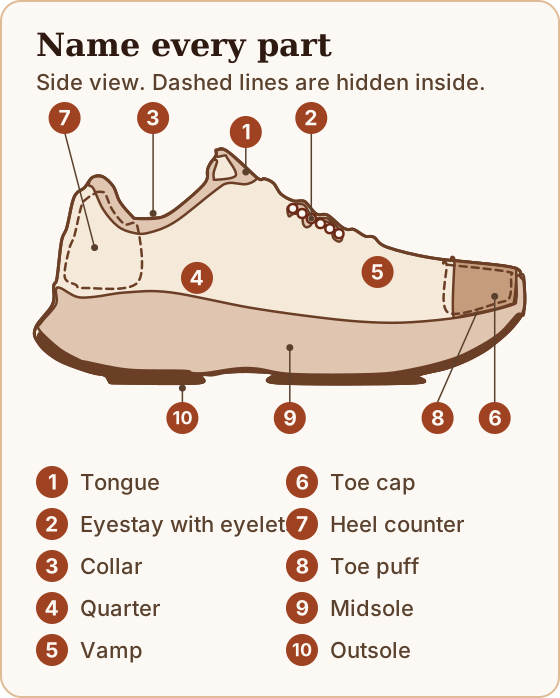
Use the same words the factory uses for the parts. Here they are:
3. Material map
Take a black-and-white drawing of the shoe and give every piece a number. The numbers on your spec sheet must match the drawing. Motawi counts by tens (10, 20, 30) so he can add lines later, and uses letters for outsole parts. It takes a few minutes and prevents simple mistakes.
4. Spec sheet
This is the factory's shopping list, and the same idea as the BOM in our handbag BOM post. Each line has the part name, the material, the color, and the supplier. Add thickness, emboss pattern and backing when they matter.
Motawi splits the sheet in three:
- Upper: start at the front and work back. Then the inside: linings, reinforcements, glue, collar foam, thread.
- Outsole unit: rubber parts, colors and logo, rubber hardness (Shore A), midsole material and hardness, sockliner foam and cover.
- Packing: everything that ships with the shoe. Box, tissue, tags, extra laces, a user manual in a bag.
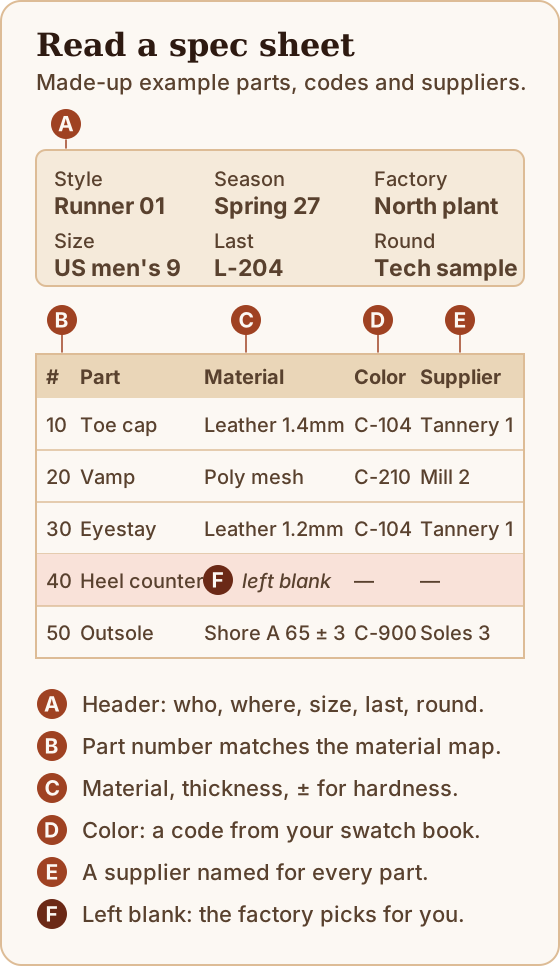
The book is blunt about it: "A detailed specification sheet is critical to your success." If you leave a line open, the factory developer picks whatever they have in the building. That may be fine. It may not. Then use the same sheet to check every sample that comes back. Highlight each difference and ask why. Sometimes the factory's substitute is better, and now you can choose it on purpose.
5. Last
The last is the foot-shaped form your shoe is built on. It sets the size, the silhouette and the outline, so it decides most of the fit. The book calls it the starting point of every shoe design. A pack with no last has a hole in it.
Put the last code on the header. When you ask for a last, ask for the drawing too. Most of a last's measurements are volume, not only length and width:
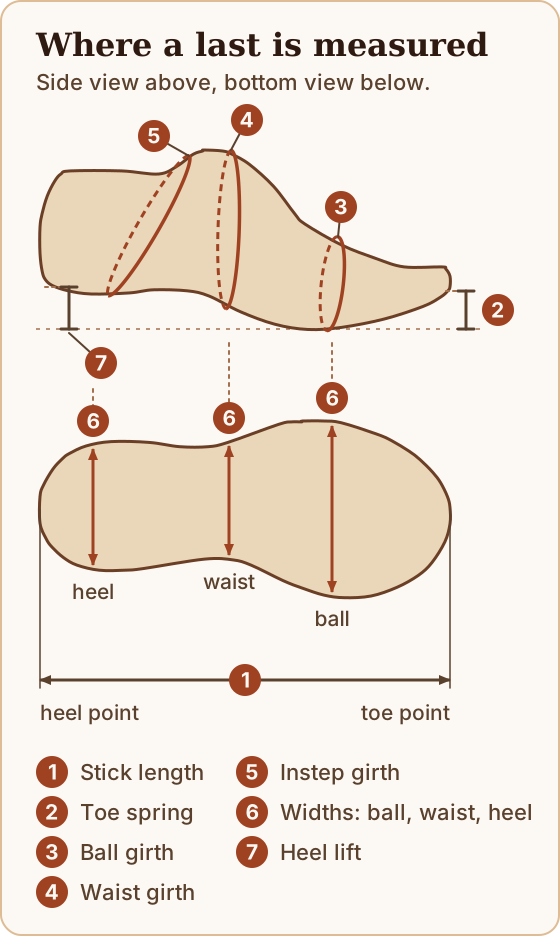
The book lists the same points plus heel lift and bottom length. Ask for them as a drawing or a table.
6. Measurements and tolerances
Draw the shoe with arrows showing where each measurement is taken. Then add a table. Core shoe measurements include full height, heel height, sole length, shoe width, opening length and sole height. Some styles add more, like side panel length.
Add a tolerance to every line. A tolerance is the amount the factory may be off, plus or minus. It is not only for lengths. In the book, the rubber outsole is called out as Shore A 65, plus or minus 3. Here is an example layout. The numbers are only to show the format:
| Point of measure | Sample size spec | Tolerance | | --- | --- | --- | | Heel height | 25 mm | ± 1 mm | | Sole length | 280 mm | ± 2 mm | | Opening length | 95 mm | ± 2 mm |
Do not copy these values. Measure your own last, pattern and prototype.
7. Construction and stitch details
Say how the shoe is built. The book follows two main sneaker methods: cold cement, where the upper is glued to the sole unit, and vulcanized, where rubber is cured in an oven. Leather shoes may be Goodyear welted. Name yours.
Then say the lasting method, how the sole attaches, the stitch type, stitches per inch, and the thread size and color. If you do not state the thread color, you get whatever is on the machine. One best-practice guide says the same thing in general terms: define construction down to the stitch, because vague notes let factories apply their own defaults.
8. Sizing and grading
Grading is how the other sizes grow from the sample size. State the size run and the rule for each point of measure. Two facts from the book help:
- In US sizes, each half size adds about 4 mm of length, and each full size about 8 mm. A size 12 is not twice the length of a size 6.
- Other points, like waist width and ball girth, grade at different rates. Do not scale the whole shoe up by one number.
The factory does a first grading pass by computer from the last dimensions, then people correct it. Every size then needs its own patterns, cutting dies and outsole tooling. The book says that can take 60 days, and ends with a test pair in each size.
9. Packing and quality notes
Say how pairs are packed, how boxes are labeled, and what you expect on inspection. The book grades shoes A, B and C, and defines an A-grade shoe as one that follows the production specification and matches the approved confirmation sample. Write that standard into your pack. Its five inspection questions make a good short list:
- Is it the correct shoe, and a matched pair?
- Is it clean?
- Does it follow the spec?
- Is the workmanship good?
- Is it damaged?
10. Revision history
Record every change with a date. When the factory sends sample two, you want to know which version of the spec it was built from. Motawi says "the approved spec sheet will become the contract with the factory." So the pack is a live document until you approve it, and then it is the record. Keep your old packs organized.
What comes back: the costing sheet
Once the shoe is confirmed, the factory takes your spec sheet and prices every line. That is the costing sheet. It lists the cost of each part and how much of it a pair uses, plus a cutting-loss percentage. The book gives two examples: under 5% for mesh, and as much as 20% for fine leather. You pay for scrap. (Our leather yield post shows how to measure your own.)
The factory can only cost what is on the spec sheet. So the book says everything in the shoe box must be listed. Still build your own estimate before you send the pack. A shoe you cannot afford to make is not finished.
Sample rounds: when the pack changes
Expect to revise the pack after every sample. That is normal. What is not normal is sending a version you did not read. Motawi describes three rounds at a big sneaker company:
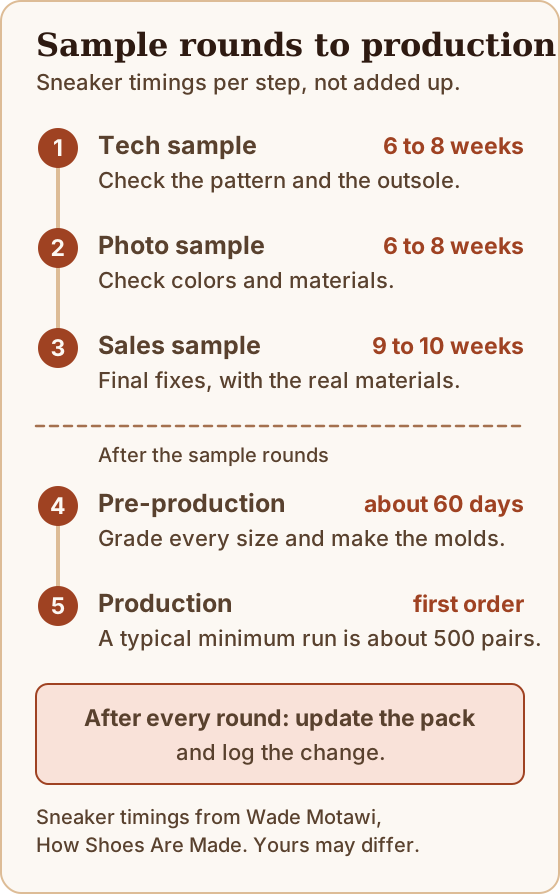
These are big-brand sneaker numbers. A small brand or a leather shoe may run faster or slower. The point is the rhythm: each round has one goal, and your pack should say what changed since the last one.
Common ways a pack fails
- Missing sample size. Everything downstream shifts.
- No last code. The factory picks a last, and the fit is not yours.
- Blank spec lines. The factory fills them with what is on the shelf.
- No tolerances. "Heel height 25 mm" could mean 24 or 27.
- Vague materials. "Brown leather" is not a spec. Give a name, finish, thickness and color code.
- Numbers that do not match. The spec sheet and the material map must use the same part numbers.
- Unchecked file. Read every line before you send it. A second person should look too.
- Email chaos. Send one clean PDF, not a chain of attachments.
How MYC helps
Frank built Maker's Yield & Cost (MYC) because writing a tech pack by hand in a document or spreadsheet means retyping the same data in three places. In MYC, the Tech Pack is a standard specification pack for your manufacturer, produced in one tap. It works on your phone and in your web browser.
Each exported Tech Pack also carries a Smart IP Shield™ (Patent Pending) seal with a digital fingerprint of your design data.
You still need to know what belongs in a pack. This checklist is yours either way, and nothing here requires MYC.
MYC is in a free academic beta for students, faculty and alumni with an active school email. No credit card. Join at makersyield.com/en/campus-to-studio.
Sources
Web pages opened and read on 2026-11-03. The Motawi book is read from the author's copy; all drawings are our own, not copied from it.
- Wade Motawi, How Shoes Are Made (2018 edition), Shoemakers Academy. Chapter 2 (spec drawings), 4 (spec sheet, header, material map, outsole and packing sections), 6 (sample rounds), 7 (grading, size 9 and 7 samples, about 500 pairs), 13 (the last and its measuring points), 14 (costing sheet and cutting loss), 24 (A, B and C grades and inspection). Read it for the full detail.
- Techpacker, How to create a tech pack for footwear. Footwear pack sections: size range and sample size, sketches and colorways, BOM, measurements and callout arrows, costing sheet, core shoe measurements.
- World Fashion Exchange, 7 tips and best practices for creating a successful tech pack. Construction down to the stitch, grading, colorways, 1:1 plotting, auditing specs before sending, approved versions.
The tolerance values in the example table, and every name, code and supplier in the drawings, are illustrative only. Techpacker makes tech pack software and writes useful guides. We used its public guide and have no view on its product.